Learning NanoBot
Determining the Entry Point
First, determine the project's entry point, which can be found from the entry fields in the pyproject.toml file.
pyproject.toml:
[project.scripts]
nanobot = "nanobot.cli.commands:app"
The project entry point is nanobot.cli.commands:app.
commands.py in the project structure: 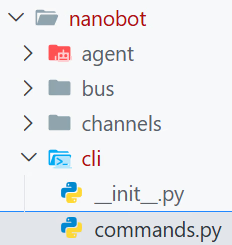
nanobot/cli/commands.py:
app = typer.Typer(
    name="nanobot",
    help=f"{__logo__} nanobot - Personal AI Assistant",
    no_args_is_help=True,
)
Here, app is the project's entry point, created using the Typer library to build a CLI application.
Discovering Features
Since it's a CLI application, it must have many parameters. Let's see what features it offers.
Found a decorator @app.command:
# ============================================================================
# Onboard / Setup
# ============================================================================
@app.command()
def onboard():
    """Initialize nanobot configuration and workspace."""


# ============================================================================
# Gateway / Server
# ============================================================================
@app.command()
def gateway():
    """Start the nanobot gateway."""

# ============================================================================
# Agent Commands
# ============================================================================
@app.command()
def agent():
    """Interact with the agent directly."""

# ============================================================================
# Channel Commands
# ============================================================================
channels_app = typer.Typer(help="Manage channels")
app.add_typer(channels_app, name="channels")

@channels_app.command("status")
def channels_status():
    """Show channel status."""

@channels_app.command("login")
def channels_login():
    """Link device via QR code."""


# ============================================================================
# Status Commands
# ============================================================================
@app.command()
def status():
    """Show nanobot status."""


# ============================================================================
# OAuth Login
# ============================================================================
provider_app = typer.Typer(help="Manage providers")
app.add_typer(provider_app, name="provider")

@provider_app.command("login")
def provider_login():
"""Authenticate with an OAuth provider."""| Level | Name | Type | Docstring |
|---|---|---|---|
| Main App | onboard | Command | Initialize nanobot configuration and workspace. |
| Main App | gateway | Command | Start the nanobot gateway. |
| Main App | agent | Command | Interact with the agent directly. |
| Main App | status | Command | Show nanobot status. |
| Group | channels | Subcommand Group | Manage channels |
| ├─ Subcommand | channels status | Command | Show channel status. |
| └─ Subcommand | channels login | Command | Link device via QR code. |
| Group | provider | Subcommand Group | Manage providers |
| └─ Subcommand | provider login | Command | Authenticate with an OAuth provider. |
Core Logic
From this, we can see a command named agent. Starting from here should lead us to the core of this project—the agent's core logic.
agent_loop = AgentLoop(...)
"""
The agent loop is the core processing engine.

It:
1. Receives messages from the bus
2. Builds context with history, memory, skills
3. Calls the LLM
4. Executes tool calls
5. Sends responses back
""
AgentLoop is the core processing engine of this agent project. It receives messages from a bus (some kind of bus?), builds context using history, memory, and skills, makes LLM requests, executes tools, and sends back responses.
That's right, this agent is the command to run the agent, and it supports two interaction modes:
- Run a one-time task via
-m - Continuous interaction without
-m
If the user specifies the -m parameter when running the command, the messages parameter of the agent function will have a value. By checking whether the messages variable has a value, we can determine which interaction mode the user wants to use.
One-time
    if message:
        # Single message mode — direct call, no bus needed
        async def run_once():
            with _thinking_ctx():
                response = await agent_loop.process_direct(message, session_id, on_progress=_cli_progress)
            _print_agent_response(response, render_markdown=markdown)
            await agent_loop.close_mcp()

        asyncio.run(run_once())
###
agent_loop.process_direct(...)
'''Process a message directly (for CLI or cron usage).'''
Run the asynchronous function run_once() within the asyncio event loop to perform a one-time agent interaction.
With the thinking context _thinking_ctx(), run the agent and get the result via agent_loop.process_direct(), print the result via _print_agent_response(), and gracefully close MCP via agent_loop.close_mcp().
At this point, I'm thinking: should I look at the continuous interaction logic next, or dive deeper into the process_direct() method?
I finally decided to look at this method first, because it's the path to deeper understanding of the agent's core logic.
process_direct
In one-time interaction, the parameters passed to this method are message, session_id, on_progress=_cli_progress.
message: the message passed via-m/--messagein the commandsession_id: the session ID passed via-s/--sessionin the command, default value iscli:direct.- Not going to study that for now…
    async def process_direct(
        self,
        content: str,
        session_key: str = "cli:direct",
        channel: str = "cli",
        chat_id: str = "direct",
        on_progress: Callable[[str], Awaitable[None]] | None = None,
    ) -> str:
        """Process a message directly (for CLI or cron usage)."""
        await self._connect_mcp()
        msg = InboundMessage(channel=channel, sender_id="user", chat_id=chat_id, content=content)
        response = await self._process_message(msg, session_key=session_key, on_progress=on_progress)
        return response.content if response else ""
Note! In one-time interaction, two positional arguments (message and session_id) and one keyword argument (on_progress) are passed.
- Asynchronously call
_connect_mcpto connect to the configured MCP server - Create an object of type
InboundMessage, namedmsg - Asynchronously call the
_process_messagemethod and store the result asresponse - Return the result
process_message
At first glance, this function has a lot of code, from line 330 to 453, but for now I'm only looking at the parts related to one-time interaction; some of the code is only needed for continuous interaction.
The first check is if msg.channel == "system". For one-time interaction, the value is cli, so this large block can be skipped.
At line 356, there's a preview. The logic is simple: if the user input exceeds 80 characters, only keep the first 80 characters and replace the rest with ellipsis when displaying.
At line 357, a logger.info level log is printed, informing that a message is being processed from a certain channel, sender, and content. The preview is used in the log message.
preview = msg.content[:80] + "..." if len(msg.content) > 80 else msg.content
logger.info("Processing message from {}:{}: {}", msg.channel, msg.sender_id, preview)
359-360, create a session based on session_key.
        key = session_key or msg.session_key
        session = self.sessions.get_or_create(key)
###
'''A conversation session.

Stores messages in JSONL format for easy reading and persistence.

Important: Messages are append-only for LLM cache efficiency. The consolidation process writes summaries to MEMORY.md/HISTORY.md but does NOT modify the messages list or get_history() output.'''
362-394, define slash commands.
        # Slash commands
        cmd = msg.content.strip().lower()
        if cmd == "/new":...
        if cmd == "/help":...
At first glance it looks complicated, involving locks, but it becomes clear when you see the return messages. These slash commands are used to control sessions. /new means creating a new session, which requires persisting the old session. This chunk of code handles related issues (what if saving fails?).
396-412, consolidate memory.
        unconsolidated = len(session.messages) - session.last_consolidated
        # 计算未整合的消息条数
        if (unconsolidated >= self.memory_window and session.key not in self._consolidating): # 若未整合的消息条数大于等于记忆窗口且当前会话没有进行中的整合
            self._consolidating.add(session.key) # 添加当前会话到整合队列?
            lock = self._consolidation_locks.setdefault(session.key, asyncio.Lock()) # 设置锁

            async def _consolidate_and_unlock():
                try:
                    async with lock:
                        await self._consolidate_memory(session) # 整合记忆
                finally:
                    self._consolidating.discard(session.key)
                    _task = asyncio.current_task()
                    if _task is not None:
                        self._consolidation_tasks.discard(_task)


            _task = asyncio.create_task(_consolidate_and_unlock())
            self._consolidation_tasks.add(_task)
414, update context for all tools that require context.
415-417, get message tools?